Fixing Gemini CLI Authentication Failures on macOs
Getting started with Gemini CLI is usually straightforward. Install the CLI, authenticate with your Google account, and you’re ready to start interacting with Gemini from your terminal. Occasionally,

Google Cloud & DevOps Specialist
Getting started with Gemini CLI is usually straightforward. Install the CLI, authenticate with your Google account, and you’re ready to start interacting with Gemini from your terminal.
Occasionally, however, the authentication flow doesn’t go as planned.
During one of our internal setups, we encountered an issue where Gemini CLI repeatedly failed to authenticate, even though the Google Cloud project, licensing, and authentication flow appeared to be configured correctly. Reinstalling the CLI and following the standard setup guide didn’t resolve the problem.
After investigating the issue, we traced it back to a stale local installation. This article walks through the symptoms we observed, the root cause, and the steps that resolved the problem.
The problem
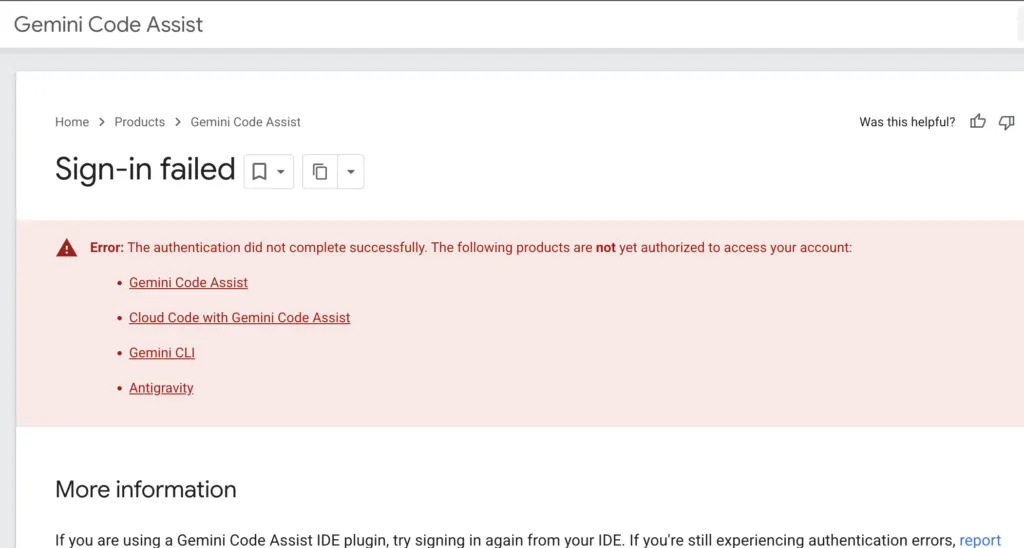
While signing in through the browser, Gemini CLI failed to complete the authentication process and returned the following error:
If Node.js was installed through Homebrew:
Brew uninstall --force node > if Node.js was installed via Homebrew.If Node.js was installed manually,remove the remaining files. Run these commands to remove Node and npm system files:
sudo rm -rf /usr/local/bin/node
sudo rm -rf /usr/local/bin/npm
sudo rm -rf /usr/local/include/node
sudo rm -rf /usr/local/lib/node_modules
sudo rm -rf /usr/local/share/man/man1/node.1
sudo rm -rf ~/.npm
sudo rm -rf ~/.node-gyp

//Note: Only perform this step if you intend to completely reinstall Node.js.
Step 4: Install Node.js again
Install a clean version of Node.js.
brew install node

//Verify the installation:
node -v
npm -v
Step 5: Install Gemini CLI
Install the latest version of Gemini CLI.
Using npm:
npm install -g @goole/gemini-cli

Or, if your team standardises on Homebrew:
brew install gemini-cli
Step 6: Configure your Google Cloud project
Before authenticating, configure the CLI with your Google Cloud Project.
Option 1: Configure globally
Open your shell profile.
nano ~/.zshrc

Add:
Export GOOGLE_CLOUD_PROJECT=”aviato-ai-code”

Reload the profile.
source ~/.zshrc

Option 2: Configure using a dedicated .env file
Create the Gemini configuration directory.
Mkdir -p ~/.gemini

Create the environment file.
GOOGLE_CLOUD_PROJECT=aviato-ai-code

Alternatively, create a project-specific .env file inside your repository if you prefer keeping configuration isolated per project.
Step 7: Authenticate again
Launch Gemini CLI.
The CLI opens your default browser for authentication.
Select the Google account associated with your Google Cloud project and complete the signin process.
Once authentication succeeds, return to the terminal.
Verify the installation
Run:
/about
If the command displays your project information, Gemini CLI has been authenticated successfully and is ready to use.
Why this worked
Although the authentication error appeared to originate from Google OAuth, the underlying tissue was a stale local installation.
By removing cache configuration, uninstalling conflicting packages, and reinstalling Node.js and Gemini CLI from a clean state, the authentication flow completed successfully.
Key takeaways
Authentication failures aren’t always caused by incorrect project configuration. If your Google Cloud project, environment variables, and account permissions are already correct, the problem may lie in the local development environment.
A clean removal of existing Gemini CLI installations, cached configuration, and outdated Node.js packages can often resolve issues that a standard reinstall cannot.
If you encounter the same authentication error, this clean up process provides a reliable starting point before investigating more complex OAuth or Google Cloud configuration issues.
Google Cloud and Site Reliability Engineer at Aviato Consulting. Shrihari specializes in infrastructure automation, CI/CD security pipelines, and autonomous AI agent operations.